Friday, November 28, 2008

False tips on Blogs /Forums/ Groups to Improve Internet broadband speed in Vista,XP

Do you know, there is myth or misunderstanding about Windows XP and Vista that by default these OS reserves 20% of bandwidth for "themselves" and it can be freed up to improve Internet broadband speed? Here, check and verify Yourself.

How to improve or increase the bandwidth?How to speed up up Internet connection?These are probably one of the most asked question by Internet users. Improvement in bandwidth for broadband Internet connection is something for which no intranet user can say "No" :-)

Windows uses "QOS Packet Scheduler" mechanism to control or limit the bandwidth for “QoS aware applications”. This mechanism has ability to force "Limit Reservable Bandwidth" in system.

See what Microsoft's Help docuement says about it

-------------------------------------------------------------------------------

By default, the Packet Scheduler limits the system to 20 percent of the bandwidth of a connection, but you can use this setting to override the default. If you enable this setting, you can use the "Bandwidth limit" box to adjust the amount of bandwidth the system can reserve. If you disable this setting or do not configure it, the system uses the default value of 20 percent of the connection.

--------------------------------------------------------------------------------

Here only, many user finds a way to improve the bandwidth for Internet uses. They feel that if “Packet Scheduler limits” the system is reduced to 0%, entire bandwidth will be free from clutches of Windows and become available for them for better Internet browsing purpose ( means data download).To achieve it, following tweak is suggested.

1. Run gpedit.msc to open group policy editor. Then follow

2. Local Computer Policy--->Computer Configuration--->Administrative Templates--->Network--->QOS Packet Scheduler--->Limit Reservable Bandwidth

It is just incorrect. See what Microsoft itself is saying about its QoS behavior.

Correction of some incorrect claims about Windows XP QoS support

There have been claims in various published technical articles and newsgroup postings that Windows XP always reserves 20 percent of the available bandwidth for QoS. These claims are incorrect. The information in the "Clarification about QoS in end computers that are Running Windows XP" section correctly describes the behavior of Windows XP systems.

(http://support.microsoft.com/default.aspx?scid=kb;EN-US;q316666)

Explanation:

Remember, QoS limitations are meant for only and only “QoS aware applications”, not all windows applications. The application which are using QoS API or specially written for this purpose, can take advantage of such setting. QoS aware application requires “minimum assured bandwidth” for proper functioning , hence windows provides it by reserving some amount of bandwidth to it. If application don't require this kind of “reservation “, Windows simply allots 100% bandwidth to all applications. Example of QoS aware application is streaming media applications like Windows Media Player or Real media. When you browse a website, note that for sure and certain ,100% bandwidth get available to you for download. But when you click on any link in webpage which later invokes Real player or WMP, in such case, 20% Internet bandwidth get reserved for streaming media operations so that you can have better audio/video experience ,and remaining 80% still available for downloading of data. Hence it doesnot affect Internet browsing experience or reduce bandwidth for Internet purpose. If application is not QoS aware , of course Windows will not bothered about specially “reserved” 20% bandwidth for it ,hence no reservation rule will be enforced. User will get entire 100% to download task.

Hope you will have now better understanding of working of QoS aware application. If it so , you will also realize the tweak suggested to improve bandwidth by changing value to 0% is just INCORRECT.

Tuesday, November 25, 2008

Date & Time Issue with Mozilla ThunderBird. Bug or Usability Problem?

When mail arrived in Inbox , it doesnot get sorted as per the system date or download date/time , but get sorted as per the date set in sender's PC .

I am using Mozilla Thunderbird ver version 2.0.0.17 (20080914). I observed a typical behavior of this software . It may be a usability issue or it may be a bug too. I set the mail sorting for Inbox. I set Mail sorting as per Date , means the last or latest received mail will be at top position in Inbox.

On 21 November 2008 , I received a mail read return receipt from recipient. As nothing unusual was in it , I just ignored it. On 23 Nov, I observed that the same mail read receipt was occupying the top position , though more than dozens mails has already arrived in Inbox meanwhile. New mails are keep coming , but this particular Return Receipt Email refused to budge from its position.

On careful examination of it, I got the clue. The recipient, which originated the return receipt has set system date on his PC as 28 Nov 2008 and Mozilla Thunderbird is sorting mail as per Date order means as per most recent date and time, hence it is occupying the top slot in Inbox.

Now I decided to do experiment further. I set the system date of my PC to back 10 October and sent mail to myself. This time ,this mail did not positioned at top position in Inbox (which ideally it should be as it was a latest email) , but adjust itself somewhere in between the Inbox , which I found only after scrolling down. The mail was sat in the group of other 10-October mails.

It is clear , Mozilla Thunderbird ver version 2.0.0.17 (20080914) is sorting mails in Inbox , based on sender's date and time not as per receivers system date and time or when it get downloaded. Ideally it should be as per receivers date and time , when it get downloaded.

This particular behavior raises some questions:
1. Why should recipients be a victim of incorrect date and time of Sender?
2. What if someone send mail with old date and time? In this case the mail will be settled at bottom or in between the mailbox and recipient will not come to know about its arrival easily?
3. For better visibility , spammers would set futuristic date say of year 2015 and such mails will always occupy top slots.
4. Most important. It seriously questions the actual arrival date and time of all existing mails as well all incoming mails in Inbox. Now I am not sure about the old mail's date and time. It may be plus or minus from the date which it is displaying.

Is this a bug of software or Usability issue??Any comments.

Thursday, September 4, 2008

Mozilla Thunderbird , an alternative to MS Outlook Requires restart

Even after typing correct username and password if you are getting message like “Sending of password did not succeed .Mail server responded Bad login
I am back!! Last few weeks i couldn't write blog. But now i am back and will keep writing as usual.
Normally I use my Webmail account to read my emails instead desktop email clients. It gives me lot of flexibility. But due to some reasons , I have decided to start using desktop email clients.
Obiviously, MS Outlook was the first choice. But this time I decided to do different.I decided to use open source email clients as an alternative to MS outlook.
I started reading on net about it I came across many articles, I found the article ... is very useful.
Finally I convinced with the features of Mozilla Thunderbird.I downloaded it from Mozilla website and installed. The installation was cool.
Next I tried to configure it to communicate with my mail server. I created my account and gave the password.When i tried to connect to mail server using Get Mail link I received the following error.
Sending of password did not succeed .Mail server responded Bad login
Earlier I thought it was due to error in password or username. I retyped it , tried again but again it gave the same error.
I tried another trick. I opened the my webmail account in web browser and typed the same user name and password. I succeed as I Log in successfully.
Now I was in catch. The same username and password was working fine with webmail account but giving an error with Mozilla Thunderbird account! What a situation.I resinstalled the Thunderbird but in vain.
I googled for this problem. I read many topics on this problem,but none of the solution was applicable to my problem. At one place I got an hint.The hint was about “bad profile”. I gave a thought for while. I decided to reload the profile first and if it fail to recreate. To reload a profile I choose to restart a system as I restarted Thunderbird many times earlier.
After retstart , I clicked on Get mail icon in Thunderbird and this time Voila! It works. Thunderbird just get connected to mail server as nothning as happend.
Do I need to tell which version of MS windows am I using? Of course it MS Windows Vista with SP1 , Business edition.

Saturday, August 2, 2008

File name case sensitivity in Tomcat

Even on windows OS, you may face a problem of file name case sensitive with Tomcat 5.x. You can easily disable this behavior of Tomcat, but at the cost of code security risk.

Last fortnight, I was surprised by a typical error in my java application. The application was working file since many years. I used to run it on Adobe JRun 4 with updater 7 on my Quad Core CPU based server. As no more future development are expected on JRun and this product is going to be phased out from market in near future, I decided to switch to Tomcat
I have some development and deployment experience with Tomcat 3.x and 4.X versions. I thought, it would be cakewalk for me to deploy the existing JRun 4 based application. In less than 10 minutes I deployed the application to Tomcat and I stared testing of it for performance.
Suddenly I got an error when I clicked on one of the link in application. The link was pointing to JPG image file in folder. I thought for a moment that I forgot to copy the images folder. So I checked the location of folder and the file name too. To my surprise, both folder and file were there. I right clicked on folder to see its access permission. The permission was set to Full. I stumped. I cleared the browser cache, restarted the Tomcat, clean the temp folder etc but in vein.
For time being I decided to kept asides this problem & further continued my testing task. I got the same problem many times and this time it was not a surprise to me. On further testing I stared noticing that some of the similar kind of linking to image are working too. Not all links to images are giving an error. Is tomcat crazy, I murmured?
Now I decided to focus on this problem. I stared reading the URI to image files carefully and noticed discrepancy. The filename of image files have different file name cases. While some image naming was all in small letters, in some cases it was either all Capital letters or mix of both. I changed the file name to all small letters and checked the errant link again. This time I was able to see the image, which Tomcat refused to display earlier.
So I got a plain vanilla solution to my problem but this incident left some unanswered questions.
1. Is Tomcat case sensitive to file naming?
2. MS windows are known to be not case sensitive like Unix/Linux. Then why this behavior on windows platform.


Now I forced to look into the documentation of Tomcat. I must admit; this peculiar behavior is well documented. One has to remove the case sensitivity exclusively by considering code security threat in mind , by making changes in “context.xml” file. So here is a remedy for this behavior which may turned out to be a problem.
How to remove file name case sensitivity in Tomcat 5.x?
1.Stop the Tomcat first
2.Switch to your $CATALINA_HOME folder means a folder where Tomcat is installed.
3.Switch to conf folder.
4.Open file named as “context .xml“ in notepad.
(In Tomcat 5.5.2.6 version I found this file as empty, means no tags defined.)
5. Add following line in this file.
AllowLinking = true
The putting of this line will disable case sensitivity checks for file naming. You can use any file name case pattern in your application.
I made the above mentioned changes and restarted the Tomcat. The problem got solved for good.
There is another solution. Besides this tag, you can also use this tag in Conext.xml file.
CaseSensitive = true
Important note:
As tomcat documentation suggests, the setting of value of AllowLinking or caseSensitive to “true” on MS windows platform, may pose problems like “allowing JSP source code disclosure, among other security problems”. Hence be careful.
I have decided to change the entire file naming conventions in my application to lowercase. Though it is tedious as well time taking job, but for the sake of security, I know, I have to do it.

Have you experience the similar Problem? Write your comments…

Wednesday, July 16, 2008

How to remove Surabaya Virus ? Manually remove; Get rid off of Surabaya Virus.

If you are receiving message “Surabaya in my birthday, Don't kill me, I’m just send message from your computer", trust that you have Surabaya virus. Don’t worry , the manual removal is easy.
Last Sunday, when my friend switch on his pc, he shocked to saw this, message, before Login.
Don't kill me, I’m just send message from your computer",
After he recovered from the shock, he called me and asked for “what could be done”.
Did you attached USB pen drive to your pc , recently? I asked. Yes, an affirmative answer. I copied the data from friend’s pc.
Then don’t worry, I assured him. It is Surabaya virus, which is easy to remove.
Surabaya virus is spread through the largely USB pen drives , via autorun. It affects the autorun.inf of pen drive. When you attach a pen drive, autorun.inf file get run and infects the local hard disks.
Other Symptoms of Surabay virus
1.All folders and files including windows OS folder disappears. Only few folder files with fixed size of 40K appears to user.
2.When you try to change the options for show hidden files, it doesn’t show the previous data.
3. You will not able to run many anti virus & software programmes. Installation also get blocked.
4. There are files like thumb.exe
5. System becomes unresponsive. After login it takes lot of time to user to operate it.
Other notable symptoms
Got to DOS prompt using CMD. On root of drive ,type DIR Prog*. *, It will show you all the content of Programme Files folder, which was not visible earlier in windows GUI.
How to remove it? You can remove it manually.
Follow these steps
First take printout of this process, here onwards.
(A) At Registry Level
Step 1:
Open registry by typing “regedit” at command prompt. In registry ,search for word "Surabaya”.
You will see two keys entries as LegalNoticeCaption and LegalNoticeText.It contains the same message, which appears at startup.
Delete these keys. No harm
Step 2: Keep searching for this word “Surabaya”. There will be lot of entries, are attached to Rundll32. Just remove the Rundll Surabaya text portion from registry key. Remember, keep no trace of Surabaya.
Step 3: Now navigate to HKEY_LOCAL_MACHINE\SOFTWARE\Microsoft\Windows\CurrentVersion\Explorer\Advanced\Folder\Hideen\SHOWALL You will see that value of CheckedValue is 0 means show all files are disabled. To enable it make it 1.
Quit from registry and got to command prompt. (Start->Run->cmd)
(B) At Command line level
Step 4. Type CD\ to switch to root of drive say C: drive.
Issue the following command
Attrib *. * -S –H –R /D /S ( Put space between /D and /S switches.)
(Note: /S switchProcesses files in all directories in the specified path. /D, Process folders as well.) It will change the attributes of all files in C drive. Surabaya hides all the files by making them Hidden and System files. This command resets the attributes of the files to normal.
While running this command you may receive error for System Volume information folder. Just ignore.
Repeat this command to all drives in your system.
Now you may be able to see all files and folders in your drive.
Step 5 :When you click on infected drive, the autorun.inf file points to some thumb*.exe file. So delete both the files Autorun.inf as well thumb.exe
From command prompt issue following commands.
Del c:\autorun.inf
Del d:\autorun.inf
(If D drive present. Do same for E, F: drives)

Del c:\thumb*.exe /S
Del d:\thumb*.exe /S
You may see the command is deleting thumbs.db files too. Don’t worry, these files will get regenerated
Check the Autoexec.bat files in C: drive. Remove the suspicious entries , if any.
Step 6 :Download and install “autoruns” utility. Check the startup programmes in “Logon” and remove the suspicious entries from startup.Restart the system. Now you should not get any message at startup. The virus is removed now. Relax...

Join us on Twitter : @Techfreakindia
Post Your Comments

Sunday, July 6, 2008

How to extract pages from PDF document

There are lot of PDF extractor or editors are available but most of them are not free.You can use PDF printer to extract PDF pages.

Last week I felt a need to extract a single page from a PDF document,which was having 83 pages.I searched on web for any PDF extractors or editors.I couldn't get the suitable one as most of them are either sharewares or put their own watermark on extracted pages.

The good one are the paid one.

Suddenly an idea clicked in my mind.I realized that Bullzip,a freeware PDF printer is already installed on my system,which I use to convert my MS word documents to PDF.There are whole lot of well established freeware PDF printers like PDF995,CutePDF, PDFcreator, doPDF,Go2PDF etc are available.PDF printer always creates output as PDF file.


Simple method to get PDF page from PDF document


We know that when we issue a print command via GUI,we have various choices like (1) we can print whole document,(2)we can print a Selection in document and (3)we can print the page range in document.To extract a pages from PDF document,I relied on third option i.e. range of pages.I simply loaded the documents in Adobe Acrobat and clicked on Print icon.From the drop down of available Printer list,I selected Bullzip PDF printer,and in print range I entered Pages from 36 to 36.Later I clicked on OK button to print.I entered the PDF file name for page no 36, as c:\page36.pdf and clicked on Save button.Voila!! The single page is now saved as separate file.


Basically,you can use PDF printer to save or extract(?) the page(s) from PDF document,you cannot use it to edit the PDF file or to remove page from PDF document.Instead of single page,you can select the page range too, hence multiple pages can also be extracted to single file.


Happy PDF extraction

Wednesday, June 18, 2008

FireFox 3 : The Competitor of IE 8: Usability and some other issues

FireFox 3 claims to be an enhanced version of FireFox 2.However I observed some issues which may annoy you.But it is worth to consider as "competitor to IE 8"
Today being a download day (17 June 2008), I downloaded FireFox 3 as I pledged. No need to say as Mozilla poised to set a Guinness Book of record for its one million downloads in a day, It took me total 15miniutes to download 7.14 MB FireFox setup file on my broadband connection.
I uninstalled the previous version and installed the FireFox 3. The installation was cool. When I launched the FireFox, it gave me some error related to Hindi language add-on pack. As I was in hurry to explore this new version, I just ignored it and went ahead.
The nice, cool interface of FireFox 3 was ahead of me. I started glairing at screen and clicked on various options to find out “what is New”.

As I have yet to explore it fully, so far I have noticed some “uncomfortably things”

1.FireFox 3 importes the bookmarks from Bookmarks Toolbar of IE 7. It arranged in alphabetical order on Bookmarks Toolbar. User not desire it, as user always set their bookmark as per the relevance and importance of websites for them.
I noticed it immediately when I clicked on very first bookmark (which is my this blog begins with Letter “T”) and in returned, it opened some other book marked webpage.
2.
Missing Forms and Dom Inspector feature in Tools menu. I am so used to use these features; the missing of Form feature really annoyed me.
3. I usually visit the Hindi language website http://www.rajasthanpatrika.com/. I download the font from website and installed properly in my XP system. Though I am able to see this site properly in IE 7 without any problem , I could not see the font ( Which is True Type font) properly in FireFox 3. May be some thing need to be set in FireFox 3, which I don’t know at this stage, but it also causing annoyance
.
.
.
.
As I have yet to explore it fully, I hope to come back with some more observations. but one thing is sure,Microsoft will soon consider FireFox 3 as its competitor.Tough time ahead for IE-8
Post your Comments

Friday, June 13, 2008

MS SQL 2005 Timeout error, when you try to modify large table.

The default value for time-out is 30 second, which is insufficient for large database/tables. Change it according to your own requirement, using "Tools->Option" menu of MS SQL Server management Studio.
Yesterday, I encountered the MS SQL 2005 error. I transferred the SQL 2005 Express edition database from server to my PC. The database is having 75000 records.
I have a J2EE application, which communicates with MS SQL 2005 database. For testing purpose, I tried to insert some data into database using JSP/HTML form of my J2EE application.
During testing, I got an error by J2EE application indicating that the ID field of database is not accepting the "null". As the application is running file on server, I guessed that something wrong with my PC’s database, which I have just ported.
I open the table design in MS SQL server management Studio. I checked the database of my PC. As ID column of my database's Main table was remained unchecked for "Allow null" it was imperative to give some data to this column. I noticed that the ID column was also not set as "auto- increment" (old terminology) that’s why this problem. So I decided to set it right.
I open the table design in MS SQL server management Studio. I selected the Main table of my database and choose "Modify". In Column Properties of ID, I selected Identity Specification. I changed the value of "IS Identity "from "No" to "yes". I kept identity increment "1".That was sufficient for me. I tried to save these setting in the anticipation so that it will serve the purpose for my J2EE application testing. When I tried to save the changes in Main table structure, I greeted with this message
------------------------------------------------------------- --------------
Unable to modify table.
Timeout expired. The timeout period elapsed prior to completion of the operation or the server is not responding
.
--------------------------------------------------------------------------------
Surprised! i have not encountered this error so far. I tried again, 4-5 times and every time I got the same error. I conclude that somewhere there is a time out setting.
I started exploring various option of MS SQL Management Studio Express options. Under tool menu I discovered one option named as "Table and Database designers" in "Designer" option. In this ,there is a option called "Transaction time-out after:".
Eureka!! That’s what I wanted. I noticed that the initial value was 30 sec. without wasting a time; I put on leading zero and made it 300 sec. I tried again the table saving and this time Voila!! It worked. It saved my settings.
Useful information.
Whenever you try to make changes in large table , the MSSQL first create the temporary table and create the schema of table , which includes user's changes. Later it copies all the data from source table to this temporary table. Once MS SQL creates temporary table successfully with data and user's changes, MS SQL drops original table and rename the temporary table to original one's name.
This process is not only takes time but also takes disk space too. Hence if you are trying to make changes in large database table, make sure.
1, There is enough free disk space, ideally 20-25% more than db size
2. Donot forget to change time-out setting in MS SQL Server Management Studio Express
. Keep it double it till it permit saving the changes. Once your job is done, set it back to 30 sec as it is good for most of the operations.
Happy Database Porting

Post your Views

Sunday, June 1, 2008

Parts inside your printer are at the end of their service life…Epson Printer error

Epson Stylus C41 UX Printer gives this error after printing 8000 pages (As of my experience). No need to throw the printer, you can very well rejuvenate it. Printer manufacturer hide this fact from you.
Few days back I encountered an interesting problem. The problem was with my 3-4 year old Epson stylus C41 UX inkjet printer. The printer had been working fine without any sign of any kind of error. I usually pay enough attention towards its preventive maintenance.

One fine day, after taking two printouts, the red and green lights of Epson C41UX starts flashing and a message on screen
"Parts inside your printer are at the end of their service life. See your printer documentation.”
I was taken aback. I never heard of such problem earlier. After passing of some time of surprises, I started thinking on this problem. The questions, which rose in my mind, were.
* How do printer come to know that it is a time to call a day? Is there any timer or time stamp in printer?
* Is there any counter, which keeps track of number of printing operations? If so how many prints can one take? What is the value of this counter? Is it mentioned in printer manufacturers documentation? If not Why?
* Is this a trick of printer manufacturer to force user to buy a new printer?
As it was my first experience, I hooked to Google. To my surprise lot of documentation is available for this problem.
I read lot of documentations and finally zeroed down on the following URL.
http://www.hm2k.com/posts/parts-inside-your-printer-are-at-the-end-of-their-service-life
It is extremely useful documentation to solve this problem. I followed as mentioned and finally I was able to revive my printer. Entire procedure is laborious, tricky but one can definitely enjoy it.

To solve this problem one has to download and install Epson SSC service utility a freeware (
http://inkjetprinterhelp.us/sscserve.exe ). With this utility you can reset the all the counters, which keeps track of printing count and reset to zero. Once all counters set to zero you will not get this message and no flashing lights. In other words YOUR PRINTER WILL BE A NEW ONE.

In this process I discovered that you could take maximum 8000 (Eight thousands) printouts, before this message greets you. In my case the counter was reached to 8007.

There is another useful link to solve this problem, but it is very comprehensive
Epson printer problem by
Richard (11/15/03 8:26 AM)
http://www.fixyourownprinter.com/forums/inkjet/14116.

Happy Printing
****** Read Other Popular Posts ******
1.Installing XP over preinstalled Vista for Dual boot: Vista will not boot
2.Prevent, Block, Disable use of USB flash / Pen / hard disk drives
3.Usage of USB drive to boost Vista with ReadyBoost

Post your Views

Sunday, May 25, 2008

Adobe JRun 4 fails to run on Quad core, Multi-core CPU, requires Updater 7

An attempt to install and run Adobe JRun 4 on Quad core CPU requires "Updater 7"... essentially.
JRun 4 is a J2EE application server. It is now with Adobe. Earlier it was known as Macromedia JRun 4.Before Macromedia, it was with Allaire.

Last month, I handled a typical problem.I decided to port a copy my existing J2EE application to a new server.As the application undergoes major changes,I thought it would be better to run it for testing purpose on different server, other than production one.I identified my new Intel Quad Core CPU as a server.I installed the necessary JRE environment, set the environment variables and tried to install the JRun 4.
As usual installation started and ended without any error.I installed it on path C:\JRun, by default.Next, I tried to start JRun from but it failed.

After a thought I noticed that I have not installed its updater.So I took updater 6 for JRun 4 and tried to install it.

Whenever you run the updater of JRun 4, it updates the earlier copy of installation.I clicked on installer of updater and to my surprise it failed to detect the C:\JRun path. It detected (?) and displayed the path as C:\opt.There was no option to change the path to C:\JRun.It really stumped me as I installed it several times in last 3-4 years, and never came across such basic problem.
I tried to search for a solution to this problem in Google and other forums, but in vain.
Then I hooked to Adobe website and came to know about the new updater i.e. JRun 4 Updater 7, released in November 2007.
I started reading about updater 7.Here I noticed that JRun 4 updater 7 is released for new platforms.
Here lies a problem! I was using old updater version 6 on new hardware i.e. Intel Quad Core CPU system. My earlier installations for JRun 4 were on P-IV systems, which I did 3-4 years back. The update 6 behaves erratically on Quad core CPU or in other words it is not meant for Multi core CPU systems!!

I downloaded the updater 7, installed it and voila!It detected the path C:\ JRun in first attempt! No need to say, rest of installation was successful and I ported my application easily.
Caution: If you are planning to purchase or use Adobe JRun 4, think twice! Adobe announced to discontinue new feature development for JRun 4 .It seems Adobe is planning to discontinue this product. Read more about it on Adobe website. (http://www.adobe.com/products/jrun/productinfo/faq/eod/)
Give your comment

Tuesday, May 13, 2008

Installing XP over preinstalled Vista for Dual boot: Vista will not Boot

(If you are planning to install Windows XP on preinstalled Windows Vista , be careful and aware about how to restore Vista Bootmgr.)

You may need to install Windows XP over preinstalled Windows Vista system. But it is not as straightforward as it looks or similar to installation of XP over win 2k or win98 etc.

After installation of XP, the windows Vista no longer starts. In this case, only the Windows XP get booted. So whatsoever operations requires to restore Vista, you have to do it from XP.
Tech Details:
Installation of windows XP over Vista system means you are overwriting the Vista Boot manager Programme known as Bootmgr. Bootmgr remained installed in boot sector in Vista system. Since you are installing windows XP now , so be ready to replace the Vista Bootmgr with XP boot sector. The XP boot sector loads XP Ntldr programme while Vista Bootmgr loads BCD (Boot Configuration database) to load either Vista or XP as per user choice. If user chooses XP the Bootmgr does loading of Ntldr ,and Ntldr parse Boot.ini file to enumerate the XP operating systems.

After installing XP over Vista you may not be able to run Vista at first. The reason is: you donot have Vista Boot manager which take care of Loading of Vista BCD ,as well as XP ‘s Ntldr.Since BCD is not getting loaded hence Vista fails to load.
What if you are able to restore the Vista Bootmgr? Of course it will server the purpose.
How to restore Vista Bootmgr:
Using Vista Boot DVD:


Boot in XP , Type Command at Run prompt( by pressing Windows Key +R)
Insert first Windows Vista DVD/Media.
Type media drive letter, change directory to boot. If your DVD drive is F:, the path should be f:\boot
Now run the following command
F:\boot\Bootsect.exe /NT60 All
It will restore the Vista Bootmgr in boot sector and allows you dual boot.
Use of EasyBCD
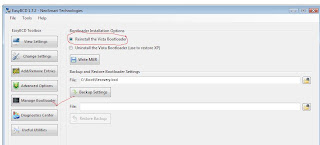
EasyBCD is also a very handy utility to restore vista Bootmgr. Download it in your Windows XP system and Install it. But be careful. Make sure that Microsoft DOT Net framework is installed on XP system; otherwise this tool will give you error from installation itself.
EasyBCD is GUI based tool and you can easily restore the Vista Bootmgr .(See the image)

Happy Installation of XP over Vista

Tuesday, May 6, 2008

URL not allowed error: Google Sitemaps error: Blog on Blogspot.com

URL not allowed error: Google Sitemaps error: Blog on Blogspot.com
(The sitemaps addition of your blog (on Blogspot.com) to Google may not be successful as URL got blocked.)

While applying SEO techniques (Search engine Optimisation) to my Blog, I came to know about Goggle Sitemaps.Google Sitemaps let you submit the links from your website to Goggle search engine crawler for better and faster indexing. To take advantages of Goggle Sitemaps, one need a Webmaster account with Google for the sites, which he/she manages.
I created my account in Google Webmaster tools and submitted “atom.xml” and “rss.xml” files, as sitemaps file, initially.

Next day when I checked my Webmaster account for Sitemaps statistics report, I got the errors as follows.
URL not allowed. This url is not allowed for a sitemap at this location. See the image below.

Means Google didn’t found atom.xml and rss.xml file. I clicked on "Help" icon for details of error. Here I got some clue.


It first indicated clearly that atom.xml file should be in root of the website. It also indicated that atom.xml should not be on any other redirected domain or website. Being a Blog on blogspot.com, it is not possible to control the physical location of these files on blogspot server.

I checked the Blogspot Sitefeed entries here I found the entry for "Post Feed Redirect URL" like “http://feeds.feedburner.com/blogspot/fGLf “. See the Image below.
Immediately I guessed what is going wrong. When crawler come to check “rss.xml” file or “atom.xml” file it checks it in the root directory of website. Here, it was getting redirected to feedburner site, and started giving an error. So without wasting a seconds, I deleted feedburner entry (of course for time being) and re-submitted the sitemaps.

Voila! this time within half an hour Google crawler Okayed it. It seems the problem is solved . Rest is depend on Time table of Google which will index my blog. Of course, it is not going to take months time which happens usually.


On further digging, I came to know that there is no need to remove feedburner entry. Instead you can append the sitemaps file name as rss.xml?redirect=false , instead plain rss.xml. It will serve the purpose. Same is true for atom.xml file.

Saturday, May 3, 2008

Vista Networking: Disable Auto-Tuning feature

(If file is taking longer time while copying over network, connection getting dropped frequently, Slow Remote desktop ,try to disable Vista’s auto tuning feature and see the difference)
Since vista's arrival on cyber earth, life of network user becomes more difficult. Suddenly there is a realization that networking in vista with other OS system is not as "evolved" as it is with other ‘races’ of operating systems. The main reasons backing such feelings are
1.Vista takes longer time to copy medium to large size files over network.
2.Large File transfer is also not as reliable as in XP networking and other OS
3. If you copy/ move big files even on the same partition, it takes long time to determine how much is data sized, how much time it will take to copy , before beginning the actual task of copying/moving. Whereas even in windows 98 , it is as quick which can be termed as “Instantaneous”.
Why this is happening with Vista? Here lies the answer

Windows Vista equipped with new feature called "Receive Window Auto-Tuning”. It constantly monitors network bandwidth for its capacity and network latency. Based on network conditions, it adjusts the TCP window size on the fly, in real time. If network condition is good it can scale up TCP windows upto whooping 16MB size or more, and if it is poor it can scale it down to default 64K size.

Because of this auto-tuning feature or changing nature of its networking component, Vista causes troubles to other network PCs in network , servers , firewall-systems, software and ultimately users. When it scale up the TCP windows size, it is not necessary that client is also " capable and ready " to accept and work with that data size determined by Vista. Many firewalls also limit the maximum size of TCP packet to prevent DoS kind of attacks. Thus vista's decision to increase in packet size well shot down by such filewalls. There are many such situations in which change in packet size by vista on the fly will not be understood by networking system and ultimately get blocked , which causes dropped connection even in local area network.

So bottomline: If you have small network with all Vista systems, connected via same switch, use this feature. Otherwise keep it disable. In production environment, better keep it disabled.
How to disable:

Log on as Administrator, open Command window and issue the following command
netsh interface tcp set global autotuninglevel=disabled
It will do rest of the job for you.
If you experience that your Remote Desktop connection is slow , type this too .
netsh interface tcp set global rss=disabled
If you have any problems, then to turn auto-tuning back on type the following in
command prompt:
netsh interface tcp set global autotuninglevel=normal
Happy Networking

Friday, April 18, 2008

Usage of USB drive to boost Vista with ReadyBoost

Why are you keeping your USB flash drive idle? You can utilize your USB Flash drive / Pen drive to boost performance of windows Vista system.

Recently I tried windows vista ReadyBoost feature and I noticed that it improves system performance noticeably. The system becomes more responsive and appears to be a faster then earlier one.

How to do it?
Very simple. Just plug in the USB flash drive. Windows will detect it and prompt you for various “What to do” options. In this list , at the end you will see a ReadyBoost option. Select it. Assign at least 512 MB disk for ReadyBoost. That’s all. Now your Flash drive is ReadyBoost drive too. You can see ReadyBoost.sfcache, a hidden file on it.

How it works?
It is all about Sequential Vs Random Access game.
Remember, USB drives are slower in reading large data if it is placed Sequentially, but it is very fast when the data need to be read Randomly in small chunks. Windows Vista ReadyBoost feature takes advantage of this fact only
.

Normally, when you open a Applications or large files, windows uses its RAM and hard disk to open a files. For most of the data reading Windows largely rely on Swap file, which is sequential and slower.
Come ReadyBoost drive in picture. Vista’s ReadyBoost mechanism first and foremost caches the frequent tasks like Application opening, data file access, DLL loading etc. It keeps build a database of such activities and location on hard disk. After passing some time, when you try to open the same application or data file, ReadyBoost first recognizes this operation. Then it jump to the location of data and then allows requests of large sequential reading to be fulfilled by the HDD.Here it bypass the role of Hard disk in identification of location of data. That’s all!
You can argue now, “what so special in it? It can be achieved by placing more RAM, which will also do the same trick and that too much faster!!!
Right! But remember every time it is not feasible to place extra RAM in system and here only ReadyBoost shines. It is true especially when you are using laptops, in which addition of RAM is costlier, less feasible.
So if you 2GB or more USB 2.0 Compliant flash drive, and most of the time it is idle, better use it as ReadyBoost drive. Make full use of your investment.
IMP Note: Many people argue that frequent use of USB Flash drive reduces its life as flash drives have a finite number of writes that it can support, but don’t worry. Consider the following facts:
1.USB drives comes with 5-year replacement warranty. If anything goes wrong you can get replacement.
2.You may not continue with the same USB drive in next 3 years, which you are possessing now. Increase in data holding capacity of USB drives day by day and faster hardware may force you to dump your existing USB drive. Hence make full use of it, before it become obsolete..
3. Microsoft claims even with ReadyBoost, USB drive last for 10 years.
The use of USB flash drive, reduces the hard disk spins, hence more greener computing.
So don’t Hesitate: be ready to use ReadyBoost
Links :

On Wikipedia : URI: http://en.wikipedia.org/wiki/ReadyBoost

On PC World: PC World - ReadyBoost Flash Drives Lack Significant Boost
URI: www.pcworld.com/article/id,131742/article.html

Happy Ready Boosting


Monday, April 7, 2008

How to send CTRL + ALT + DEL to Remote Desktop ?

How to send CTRL + ALT + DEL to Remote Desktop?
You cannot!! You must use CTRL+ALT+END


Case: You want to kill an errant process or application, running on remote server. You are connected to remote server using Windows Remote desktop connection. To Kill a application or process, you pressed CTRL + ALT + DEL, in anticipation that it would bring Task manager ... but in vain. Task manager does start, but on local PC, not on Remote server.

WHY ……………….. ? ??

1. You cannot!! Read what Microsoft says " CTRL+ALT+DEL always goes to the local desktop. If you need to send CTRL+ALT+DEL to the remote computer, you must use CTRL+ALT+END"
(http://technet2.microsoft.com/windowsserver/en/library/d3e3edb9-2d32-4089-949c-5f215c9787771033.mspx?mfr=true)

Remember the Key Combination CTRL+ALT+DEL is intercepted by Windows OS, so it doesn’t get pass on to remote desktop, whether it is Windows inbuilt Remote desktop or Real VNC viewer client on windows PC.

2. There is another way to kill an errant application or process.

Click on START then RUN on remote desktop (or press WinKey +R)
Type Taskmgr.exe (Remember, it is not case sensitive)

The Task manager brings the familiar screen, from which you can kill the errant process or application.

What incase you are using Real VNC viewer

The life is simpler with Real VNC viewer.

2.1: In viewer's system menu, Click on the VNC icon which is at the top left of the viewer window. In this menu, you will see a option as "Send Ctrl-Alt-Del”. Use this to send these key combinations.

2.2: Use of Shift Key with CTRL + ALT + Del makes possible to send this key combination to remoter server. So use Shift+(C+A+D ) , and get the screen.

Happy CTRL + ALT + Del ing on remote desktop

Thursday, April 3, 2008

Prevent, Block, Disable use of USB flash / Pen / hard disk drives

How to Prevent, Block, Disable use of USB flash / Pen / hard disk drives ?

On one fine day, my friend approached me and asked ,
----------------------------------------------------------------
Can I block use of USB pen drive? I donot want to block USB port as it needed for Camera and other gadgets , just want to block Pen drive or Flash drive? ”
-----------------------------------------------------------------

Use windows 2008 Server, apply group policy and through group policy you can block it... was my answer.

No, I want to do it for Home PC. I donot have Windows 2008 server or 2003 at my home.

OK I will let you know later , I gave my standard answer.

His question really stumped me. He wanted to block use of Flash drive on home pc where no server, group policy etc is there. Blocking of USB port through BIOS is not good idea as it totally block the use of USB. So I started reading on internet. The following knowledge I gained in this process

Whenever you plugged USB device in port, windows first checks the device ID.Through device ID it determines the type of device wheatear storage or Imaging or pointing device etc. If it determines that it is storage device, means Pen drive or Flash drive it loads the driver file known as usbstor.sys

So it is all about the blocking of usbstor.sys to load , which can serve the purpose.

Now there are two methods
1. Delete / Rename the usbstor.sys file so that it cannot be loaded.
2. Block the loading from registry.

Deleting or renaming usbstor.sys is not a good idea. Windows vista can restore these files during system integrity process. Hence the second option is only viable solution.

The following registry key is used for this purpose
---------------------------------------------------------- ---------
HKEY_LOCAL_MACHINE\SYSTEM\CurrentControlSet\Services\USBSTOR
------------------------------------------------------------ ------

See the DWORD "Start" and assign its value as 4, instead existing 3.

Just changing the value to 4 from 3 will disable the pen drive. If you insert the drive you will notice that light of USB Flash drive is not glowing. It indicates that driver is not loaded hence it has not recognized.

No need to say, to enable the drive just change the value to 3 from 4

Most Important: Before making any change in registry, ensure that no USB Flash drive , pen drive is connected to it. First remove the drive , then make changes in registry for usbstor.sys.
Happy Disabling of USB Flash Drive

********** Read Other Popular Posts **********
1.Installing XP over preinstalled Vista for Dual boot: Vista will not Boot
2.Parts inside your printer are at the end of their service life.Epson Printer error
3.Usage of USB drive to boost Vista with ReadyBoost
Do you like this Tip?Please Post Your Comments

Wednesday, March 19, 2008

Download Windows Vista Service Pack 1 using Download manager

Download Windows Vista Service Pack 1 using Download manager
So finally Microsoft has come out with its first Service pack for Windows Vista.(SP1)

How to download Standalone Installer?

We know it is 435 MB single file. You can very well download it from Microsoft’s website, but here lies a catch. If you try to download it using your Internet explorer 7 & Free download manager, the chances are that Free Download Manager will not pickup this file for download. This download will just bypass the FDM and you are force to download it using IE. The risk is: If download get broken, you have to start again from scratch.

How to download using Download Manager?
(Of course will require a URL for download)
1. Open Internet Explorer, and go to Vista SP1 download page. Donot Click on Download.
2. Copy the URL from Address Bar.
3. Open your Firefox browser, and paste the URL. Now Click on Download button & try to download via Firefox.
4. Firefox will start downloading the Sp1 file. Now click on Pause in Firefox download screen to pause the download.
5. Now it is paused. Right Click on File name. You will see three options, Resume, Cancel and Properties
6. Click on Properties. You will see the downloaded file URL in “From” field.
7. Copy this URL by selecting it via Mouse and pressing CTRL-C.
8. Open your Download manager, and Paste this URL in “Create New Download option or any other option which permits you to enter URL manually. To paste use CTRL-V
9. Now you are ready to download it with Download Manager.

I use this method and I found URL for SP1 is

http://download.microsoft.com/download/3/a/9/3a9b72c2-527d-4694-8a49-84c056d4c34d/Windows6.0-KB936330-X86-wave0.exe

Note: In other case this URL may get changed and not work .So rely on URL provided by Firefox.
Happy Downloading

Wednesday, March 12, 2008

Get Rid-off of Copy.exe, temp.exe files: Salga.A worm

Last week was indeed bad week for me.

I noticed that whenever I clicked on my D drive of Windows 2000 server to open a data files (As I stored Server OS and other software on C: drive only) I got message which indicated that “Windows cannot find copy.exe”. Make sure.........................


Surprised! As far as my knowledge says Copy is an Internal command of DOS and it is built in Command.com file. I have never seen any copy.exe file in Windows folder at all. Then what prompted OS to show this message?

After few seconds, the warning bells started ringing in my mind. Might be a virus!!!
So without wasting of mush time, I goggled for copy.exe and it confirmed that it is nothing but SALGA.A worm

I immediately clicked on my Clamwin anti virus button. Clamwin is the antivirus which is not only open source, free but also run on Windows 2000 server too. AVG FREE and other free antivirus doesn’t run on server editions of windows ,a s they are free for personal use.

Clamwin detected this virus and clean it. I restarted the system. After ten minutes, again I got the same message “Windows cannot find copy.exe”.
Means Clamwin did not clear it. May be a false message of removal.

Again I searched on goggle. I read many articles then finally I came to across the utility called “Perlovga Removal Tool”.

I download this tool from http://en.sergiwa.com/modules/mydownloads/ and to my surprise it was just 36 KB.

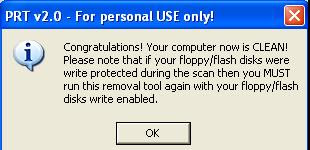
I run this file and within few seconds it gave me the message that it cleaned all the copy.exe files from entire system


I couldn’t believe it. So I created a dummy copy.exe file in deeply rooted folder of F drive and I run again this utility. As usual within few seconds, it indicated that it had removed copy.exe file. I checked the folder in F” drive and Voila… Copy.exe was not there.

I restarted the system and so far I haven’t received the copy.exe error message yet.

So it was PRT Perlovga Removal Tool , which solved the copy.exe problem.

Note: I read that this worm get spread through USB flash drive via autorun.exe files. I also noticed that it creates Temp.exe files too. The best method for removal is to start the system in Safe mode and run this tool.
But the big question is “ Why Clamwin has not detected it when I plugged USB drive to server.
Answer is very simple: ClamWin does not yet automatically scan files as they are read and written , automatically in real time. It detects only when u run it Intentionally
More info: http://forum.kaspersky.com/index.php?showtopic=29779

Sunday, March 2, 2008

Kodak DVC 325: No Support in Windows Vista & XP SP2

I purchased Kodak DVC 325, a web cam in 2002. At that time windows 2000 was prevailing OS and windows XP was trying to gain a foot. The camera worked just fine.

Then came windows XP and it forced me to download and install the camera driver from Kodak web site.The bugs in windows XP and other security issues forced Microsoft to release Service pack 2. It seems it was a death knell for DVC325 camera in windows world.

The camera just stopped functioning. Again Kodak has provided, what it feel is a “driver for Windows XP Sp2”. When I tried to rejuvenate this camera by installing this driver, it just made entire Windows XP SP2 unstable. The driver never got installed as it stuck up at installation of USB component.( usbcamd.sys)

Any attempt to install this driver hangs the system and compel you to use RESET button of PC, to restart the system. After restarting ,windows run Chkdsk ,( due to unclean shutdown) which may destroy your data and software.

Now comes Big brother Windows Vista

The Kodak website lists the name of Windows vista in type of OS in driver download section. But when you select it , the website inform you politely ( A typical cyber way to deny).
We're sorry, there are no downloads available for WINDOWS VISTA. Please select a different operating system from the menu above.
http://www.kodak.com/global/en/service/downloads/dln_ekn009389.jhtml?operatingSystem=windows_vista&downloadLanguage=en
{ Why should I select different OS , when I know I am using Windows Vista? }

As far a Windows Vista is concern, it has no concern for this camera hence in inbuilt support is missing.Kodak is one step ahead of Microsoft , by stating that “
We no longer offer technical support by phone or e-mail for this product as it has been discontinued.

Both Kodak and Microsoft rendered this working camera into “dead hardware piece” or “electronic waste”.
*************** Read Other Popular Posts***************
1.Installing XP over preinstalled Vista for Dual boot: Vista will not Boot
2.Prevent, Block, Disable use of USB flash / Pen / hard disk drives
3.Usage of USB drive to boost Vista with ReadyBoost
Post your Views

Saturday, March 1, 2008

Windows Vista Problems: Control panel not open , No personalize settings , No printing

Many times MS Windows vista behave erratically. Many users have experienced differently. The most common problems are as follows

1. You click on Control panel, but it doesn’t get open. It may open for a moment, but closed down immediately , OR ...........
2. You want to change Display properties (select the Personalize.)Option, but it cannot get opened , OR ................
3. You want to print a document, but it failed to print though printer is correctly installed, you have already taken hundreds of printout in past. But now , you are not getting printouts ,OR..............
4. You want to open System Properties by right clicking on My Computer icon , but Property page cannot get open , Or .......................
.
.
.
.
May be much more........................

Any of this kind of problem just annoys the user as it creates frustration and raises doubt about the stability of Windows Vista.
Solutions:
1.Of course Microsoft is aware about these problem very well, hence it release a Hot-Fix for it.
http://support.microsoft.com/kb/936686/en-us

Many users claimed that this Hot fix is not serving the purpose either.
But the more universal solution is here.
1. Click Start, Run CMD
2. Run Services.msc
3. Select Software Licensing service, just restart it.
4. Select SL UI Notification service and restart it.

The restarting of these services will solve the problem time being. To get rid-off of these problems permanently, you may have to wait for SP1


Post Your Comments

Friday, February 29, 2008

Automatic Defraging in Windows Vista

In Windows Vista, Windows Disk Defragmenter has an option to run it at scheduled times. This feature is provided via Control panel.

I read somewhere that this schedule task always runs at low priority of CPU. The underlying disk access algorithm is changed so that it doesn’t put overheads on system and affect its performance.

As in windows XP you need at least 15% of free disk space in order to run Defrag without getting halt at 10% of its completion. In windows Vista there is no such restriction. t seem the bar of 15% free disk space in removed.

I am eagerly waiting for arrival of final and stable version of Windows vista SP1. The reason: Current user interface of Defrag is over simplified and here lies the catch. It doesn’t allow you to select which partition or volume to defrag. In SP1, this problem is going to be fixed and options are going to be provided to select the drive letter.

Here is a Step by Step method to run Defrag Automatically in Vista

1. Click on Start
2. Choose Control Panel
3. Select the Control Panel Home
4. Click on System and Maintenance
5. In the Administrative Tools, click Defragment your hard drive
6. You may need to grant permission to run the disk fragmentr
7. Click on Run automatically (recommended)
8. Click OK

Happy Defragging

Tuesday, February 26, 2008

Eleven Secure web communication Tips

In recent past TECHFREAK sent SMS to its subscribers on Secure web communication. Following are the selected Tips. Rememebr , these tips are sent via SMS services , where charater limit is only 140 characters.
11 . A session is specific to the webuser and for each user a newsession is created to track all the request from that user.
10. HTTP is statless protocol,by implementing HTTP SessionManagement,websites manages& tracks HTTP states & conns.
9. 128 bit SSL encryption in HTTPS is diehard to break thats, whybank,creditcard e-com sites prefer it.IE5.5+,Firefox 1.0+ supports 128bitenc.
8. Part 1/2: Man-in-the-middle attack(MITM):In which an attacker is able toread,insert, modify the data between two parties.
7. Part 2/2: ...without either party knowing that the link between them hasbeen compromised.HTTPS prevent it by using encryption.
6. When request Send via https, browser's HTTPS layer encrypts it.The responfrm server also encrypted & browser's HTTPS sublayer deccrypt it.
5. QUIZ.What makes HTTPS secure....?Answer: Encryption of data using SecureSocket Layer
4. HTTP typically uses port 80 , while HTTPS uses port 443.These setting canbe changed at webserver level.
3. Https is not separate protocol.It is basically a HTTP over an encryptedSecure Sockets Layer(SSL)or Transport Layer Security(TLS)conection.
2. Difference between HTTP & HTTPS? Ans-1:HTTP is Stateless Protocol,whileHTTPS is Stateful.
1. HTTP is termed as stateless protocol becauz each command is executedindependently without any knowledge of the commands that came before it.

Please post your comments

Sunday, February 24, 2008

Administrator password in windows 2008 Server

I downloaded the ISO of windows 2008 Server and burnt the CD. I tried to install it on my Intel Quad Core CPU based system. The installation was a monotonous job, as I did not encounter any problem or configuration issue.

After successful installation, the system rebooted and it reach to a stage where it asked me to enter a Administrator password for fist time login. Here I selected my old windows 2000 server password as I don’t want to remember any more new password. As I really don’t need that kind of stringent security as Microsoft expect from me, I thought old password would worked for me. Here only Windows 2008 showed its true color. I got the message.
The message indicated: Passwords must meet complexity requirements

I tried various combinations but in vain. None of the password worked for me.
I read the help document on Microsoft website. It says password must have
English uppercase characters (A through Z)
• English lowercase characters (a through z)
• Numerals (0 through 9)
• Non-alphabetic characters (such as !, $, #, %)

The password must contain one CAPITAL letter, one number and one small letter or non-alphabetic r. So my password, which was earlier alphanumeric as “safe2092”, couldn’t work. I just changed it to “Safe2092” and it starts working.
Bottom line: Just use one CAPITAL letter in your old alphanumeric password that’s all to satisfy the complexity requirement of windows 2008.

Friday, February 15, 2008

Copy Paste between Linux and Windows, using VNC Viewer

Question: How to Copy Paste between Linux and windows applications using VNC Viewer?
Answer: Use VNCCONFIG
You are running a VNC Server on your Linux box and you are using
VNC Viewer to view LinuxScreen on your MS Windows XP. Now you want to copy text from your MS word application on Windows XP and Paste it to Office Application of Linux (Say OpenOffice.org Writer or Kword). How to do this?If you want to perform copy and paste operation between MS Windows application only, irrespective of the system on which they are running, you can achieve it easily by using Right Click button of Mouse and selecting copy and Paste. But here the case is different. Here two different system (Windows and Linux) are in picture and two different applications are there. Though you can see both the desktops Windows as well as Linux via VNC Viewer, on Windows XP, it is not a straightforward task as it appears.But the solution is simple, use “vncconfig”.The use of “vncconfig” enables you to achieve this. Just run “vncconfig &” in GUI console on Linux. You will get pop up window on your windows XP system. Keep all the settings in “Checked” state and try copy-paste operation

Monday, February 11, 2008

Welcome to TECHFREAK INDIA

Ask any TECHFREAK PERSON... For what they most passionate about ...? The most probable answer would be....

" To stay updated with Technologies and Tools".

If there is any other answer , it would simply put question mark on his/her for being TECHFREAK.

We at TECHFREAK India just help you to stay updated with ongoing Technologies and Tools...

So Keep visiting Here regularly... and Stay updated.

Donot let your passion weaken.. Stay updated with TECHFREAK.
Visit blogadda.com to discover Indian blogs